
This is an old revision of the document!
Table of Contents
JupyterHub with Slurm on Maris

As of February 2017 the maris' jupyterhub python environment is located at /marisdata/MARISHUB. If you want commands such as ipcontroller or ipyengine to work within the maris jupyterhub setup you must include it in your paths. See the examples below.
For instance in bash:
export PATH=/marisdata/MARISHUB/bin:$PATH
JupyterHub is a multi-user server for Jupyter (AKA IPython) notebooks. Though JupyterHub you can create and share documents that contain live code, equations, visualizations and text notes (comments).
Maris cluster provides a JupyterHub service which uses dedicated slurm partitions accessible only by
authorized users. Users should submit access requests via email or preferably in person to support.
JupyterHub spawns single-user notebooks by requesting consumable resources to slurm using precoded parameters in order to prevent erroneous usages. Resources are allocated upon each successful login via the JupyterHub web interface. No notebooks will be spawned in the case of insufficient consumable resources (Memory and CPU).
Access
Maris' JupyterHub facilities can be reached (N.B.: not from home) via a web browser at
https://jupyterhub.lorentz.leidenuniv.nl/

Please note that maris' jupyterhub has admin_access enabled. Admin users have the ability to take actions on users' behalf, such as stopping and restarting their servers.
Launching Notebooks
Currently all users that have access to maris will also be able to use JupyterHub provided they have been allowed to use slurm*. Upon a successful login, a dropdown menu lets users choose what type of notebook profile to spawn among a few predefined ones:

If the requested resources as defined by the profile chosen are available a single-user notebook instance will be launched enabling files management, terminals, different kerneks, etc… via a simple web interface.

slurm will write output and error files relative to the spawning of each notebook instance using the filename scheme ${HOME}/jupyterhub_%u_%j.[log|err], where `HOME' refers to your home directory and %u and %j to your username and slurm job number respectively. If launching a notebook fails, please read these output files before contacting support.
* jupyterhub will `forget' its open sessions upon restarting the slurm controller. You are highly advised to periodically save the results of your running notebooks to the disk. If you do not do so, you will loose the connection to your notebook via the jupyterhub interface.
Jupyter Enabled Extensions
JupyterHub `Files' Tab
The Files tab which is the default tab on which a successful login will be redirected allows users to create, modify and remove files from they home directories. Furthermore, it allows to initiate a terminal application and a notebook. Currently, only notebooks which use the Python3 kernel can be instantiated.
JupyterHub `Running' Tab
This tab will show any running Jupyter processes, such as notebooks and terminals.
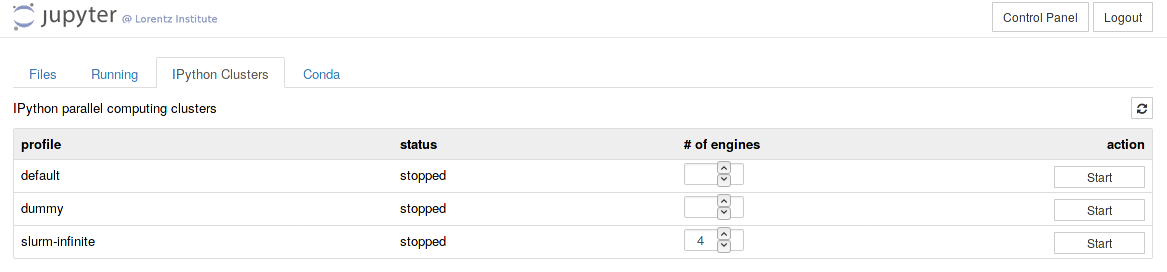
JupyterHub `IPython Clusters' Tab
JupyterHub users can distribute the load of their calculations to different maris' nodes using ipyparallel. It is highly suggested that users read http://ipyparallel.readthedocs.io/en/latest/intro.html before proceeding.
In this section we will only describe how to configure an IPython parallel computing cluster given the current slurm setup on Maris. For further info please read https://ipython.org/ipython-doc/3/parallel/.
If you are non familiar with slurm, please consult Slurm: A quick start tutorial, slurm on maris and http://slurm.schedmd.com/ before proceeding.
IPython parallel clusters configured without slurm will be terminated abruptly and automatically by the system. This might bring your JupyterHub notebook instance to a freeze state which can be cleared at any time through slurm
scancel <job ID>
where job ID is the job number relative to the single notebook application.
Examples: IPython parallel cluster profile
All IPython profiles are stored in ${HOME}/.ipython unless specified differently. You can do so by overriding the environment variable IPYTHONDIR.
First of all, create a new parallel profile. Open a terminal and type
ipython profile create dummy --parallel
This will create a new directory in your .ipython directory called `profile_dummy'
ls .ipython
profile_dummy
This directory (profile) will contain several files that can be customized to your needs. More important, you must customize its files in order to let slurm manage and use your parallel profiles via JupyterHub's interface.
Firstly, modify the file `ipcontroller_config.py' and make sure that the following lines are present
 c.HubFactory.client_ip = '*'
 c.HubFactory.engine_ip = '*'
Secondly, edit the file `ipcluster_config.py' to force ipyparallel use slurm, for instance
c.IPClusterEngines.engine_launcher_class = 'SlurmEngineSetLauncher'
c.IPClusterEngines.n = 2
c.IPClusterStart.controller_launcher_class = 'SlurmControllerLauncher'
c.SlurmLauncher.queue = u'weak-computation'

c.SlurmEngineSetLauncher.batch_template ='''#!/usr/bin/bash
#SBATCH -A your-account-name
#SBATCH -p {queue}
#SBATCH -n {n}
#SBATCH -D /marisdata/your-username/somewhere
#SBATCH -o slurm_%u_%N_%j.out # stdout
#SBATCH -e slurm_%u_%N_%j.err # stderr

export PATH=/marisdata/MARISHUB/bin:$PATH

srun ipengine --profile-dir={profile_dir}

'''

c.SlurmControllerLauncher.batch_template ='''#!/usr/bin/bash
#SBATCH -A your-account-name
#SBATCH -p {queue}
#SBATCH -c 1
#SBATCH -N 1
#SBATCH -D /marisdata/your-username/somewhere
#SBATCH -o slurm_%u_%N_%j.out # stdout
#SBATCH -e slurm_%u_%N_%j.err # stderr

export PATH=/marisdata/MARISHUB/bin:$PATH

ipcontroller --profile-dir={profile_dir}

'''
Read the slurm manuals and choose the $SBATCH options appropriately for your needs.
In this example we note:
- We must modify the variable PATH to include /marisdata/MARISHUB/bin, that is export PATH=/marisdata/MARISHUB/bin:$PATH.
- The number of engines can be set using either the web interface via the `Tab Ipython Clusters' or by setting `c.IPClusterEngines.n = #'.
- An appropriate slurm account must be charged for things to work.
- The slurm partition to which to submit your calculations can be set using `c.SlurmLauncher.queue'.
Start the Profile
Navigate to the `IPython Cluster' tab, select a profile, the number of engines and push `start'. Happy programming.
JupyterHub `Conda' Tab
This tab allows users to list and manage conda environments using jupyter's web interface. In maris' setup, conda environments are displayed if they are in the following paths:
export CONDA_ENVS_PATH=/marisdata/$USER/.conda/envs:/home/$USER/.cond/envs${CONDA_ENVS_PATH:+:${CONDA_ENVS_PATH}}

The jupyterhub environment uses nb_conda v2.0.0. This version is known to have several bugs/limitations. Among which we cite the impossibility of creating conda environments through the web interface. This limitation can be overcome taking some risks (ONLY if you know what you are doing) by editing your jupyter configuration file usually located at ~/.jupyter/jupyter_notebook_config.py adding the line
c.NotebookApp.disable_check_xsrf = True
Custom Jupyter Kernels
To install a custom python kernel you can use ipython.
ipython kernel install --name=my-python-kernel --user
Note that in the command above the python version of the kernel will be the same as the python version that ipython uses. Also, the option `–user' makes sure that the kernel is installed in your local kernel directory which can vary from system to system. In most GNU/Linux distributions these are located at
${HOME}/.ipython/kernels

${HOME}/.local/share/jupyter/kernels/
In any cases, to see where your local installation of ipython would look for installed kernels and/or to display the specs of the existing ones, type
python kernelspec list
[TerminalIPythonApp] WARNING | Subcommand `ipython kernelspec` is deprecated and will be removed in future versions.
[TerminalIPythonApp] WARNING | You likely want to use `jupyter kernelspec` in the future
Available kernels:
  py2                     /home/xxx/.local/share/jupyter/kernels/py2
  py2 test1               /home/xxx/.local/share/jupyter/kernels/py2 test1
  python3.6-2017-02-01    /home/xxx/.local/share/jupyter/kernels/python3.6-2017-02-01
  python3                 /marisdata/MARISHUB/share/jupyter/kernels/python3
Jupyter will display all conda kernels and all installed kernels you might have in the `new notebook' tab:

